Writing your first App Inventor 2 extension
Update 13 March 2021
With the launch of Rush, which is improved tooling for building extensions, this article is now outdated. To know more about what Rush is and how to use it, check out this community post.
Whether you've just started using App Inventor 2 (and/or, Kodular) or you’ve built several apps with it already, you must have come across the term “Extensions” or “Extension Components” several times. Most of you must have been using them already and making awesome apps. But have you ever thought of creating them yourself?
In this guide, I’ll walk you through everything you’ll need to know to get started with extension development. We’ll make a simple extension that will add a gradient color background to components.
What you’ll need
- A computer or a laptop configured correctly to build extensions. If it’s not, first check out this article by me — Configuring your computer to build App Inventor 2 extensions. I’ll be waiting for you here, come back soon. 😊
- Basic understanding of Java (or a similar OOP language).
Getting started 🚀
Open the Extension Template or AI2 sources folder in your favorite text editor or IDE (I’d recommend VS Code or IntelliJ IDEA). Once opened, right-click on the src directory and create a new file named com/extensions/gradient/Gradient.java . The slashes (/) here represents a folder, so ultimately, you’ll end up with a directory structure like this:
src
└──com
   └──extensions
      └──gradient
         └──Gradient.java
Observations 👀
- It is the
srcdirectory where the extensions’ source files must be placed. - Since the package names and the directory structure of Java source files are very closely related, the package name our extension will be —
com.extensions.gradient. - The class file
Gradient.javawill be the main source file of our extension. All the code that we’ll write will reside here.
So, now that we’ve created our Gradient.java class file, let’s start writing the very first lines of code for our extension. But before that make sure you delete any autogenerated code created by your IDE.
Once done, simply copy the below block of code into the Gradient.java class file:
Observations
com.extensions.gradientis the package name of our extensions. Just like every Java file, it is necessary to add it to our extension’s Java file too.- The
com.google.appinventor.*imports will give us access to various inner classes and annotations of AI2 that are needed for making extensions. @SimpleObjectis one of the many annotations that thecom.google.appinventor.components.annotationspackage provides. This annotation helps the compiler to distinguish between extension files and internal component files with the help of theexternalattribute.@DesignerComponentannotation is responsible for displaying the name, icon, description, and other information related about your extension into the component palette under the “Extensions” category.- The public class
Gradientis the main class of our extension. It extends theAndroidNonVisibleComponentclass, which is the base class for all non-visible components in AI2. And because our extension is also a non-visible component, meaning that it won’t be visible in the designer preview as well as in the compiled app, we need to extend it with it.
App Inventor didn’t supported extension components from the very beginning. They were first introduced back in 2015, created as a part of 2015’s Google Summer of Code.
Now, let’s move forward and create our very first purple-colored method block. This block will be the main block of our Gradient extension that will set the background color of a specified component to a gradient.
Copy the below block of code and add it to the Gradient class (replace //Write your code herewith the below code). The comments will help you to understand what’s going on in it.
Observations 👀
@SimpleFuctionannotation is responsible for giving our Java method the form of a purple block. It is provided by the importedcom.google.appinventor.components.annotations.SimpleFunctionclass. We’ll keep the description of the block empty for now.- The name of our purple method block will be the same as the method name, i.e.,
SetGradientBackground. - The parameters of our method make up the sockets in the blocks. In this case, there would be four sockets respectively named as
component,orientation,color1andcolor2. - Notice the type of the parameter
component—AndroidViewComponent. It is the base class of all visible/UI components. It allows us to pass a reference to any visible component to thecomponentparameter. - The parameter
orientationdefines the orientation of the gradient. - The parameters
color1andcolor2defines the colors of the gradient. In AI2, the color codes are in theintformat, that’s why we need to set the type of these two toint.
Great! Now that we’ve written our very first block, why not see it in action? So, let’s compile the extension to get the AIX file which we can load in AI2. To do so, open your IDE’s integrated terminal (or you can open the Terminal/Command Prompt in the Extension Template directory) and type ant extensions command.
Once the build is complete, you can find the extension file com.extensions.gradient.aix in a newly created folder, namely out , in the Extension Template.
Import the extension to AI2 (or, Kodular), drag-drop it to the viewer, and then go to the blocks section. You’ll see below blocks when you click the extension name.
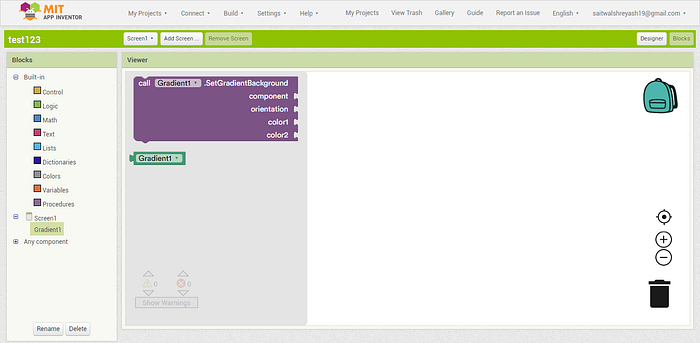
So far so good. We now know how to create the purple method block that doesn’t return anything (void). 💪
But don’t you think there seems to be an issue. Like, imagine what if someone inserted a wrong block in one of the sockets? The application will throw a runtime error and cause the application to crash. To avoid this, we’ll use the try-catch statement to handle the exception, and if an error occurs, we will call a yellow-colored event block.
So, let’s wrap the code in the SetGradientBackground method inside a try-catch statement like this:
Your IDE will now show you an error that the method ErrorOccured is undefined. Don’t worry, just copy the below block of code and paste it in the Gradient class and the error will go away.
Observations: 👀
- Notice the
@SimpleEventannotation. It is responsible for creating the yellow-colored event block. - An event block should not return anything, i.e., it must be a “void”.
- To make the event block work, we need to call the
dispatchEvent()method from theEventDispatcherclass. - The first argument of the method
dispatchEvent(),this, refers to the current Activity, in simple words the screen of the application’s interface in which this event is being dispatched. - The second argument is the name of the method (or, event block), which in this case is
"ErrorOccured". - After the second argument, we need to pass the name of all the parameters that our method has. In this method, we have one parameter,
error, so, we’ll pass it. In case we had more parameters, say,error,id,component, thedispatchEvent()method in our code would look like this:EventDispatcher.dispatchEvent(this, "ErrorOccured", error, id, component).
Great! You’ve now successfully created an event block. Now compile your extension and import it to AI2 to see the block in action. 😉
Now, you might be wondering what does that orientation socket accepts? We cannot use any default AI2 block with it as it will not work. The only way to get it working is with a block that returns a GradientDrawable.Orientation object. So, let’s create some blocks that do the exact thing.
For this, we’ll create green colored property-type getter blocks that will return a GradientDrawable.Orientation object. Copy the below block of code and paste it in the Gradient class.
Observations 👀
@SimplePropertyis used to create green colored property blocks.- If the method returns something, which, in our case is an
Object, and does not have any parameters, it will create a property type getter block. Otherwise, it will create a property-type setter block.
Similarly, we’ll create seven more such blocks that return different orientations. Like we did earlier, simply add them to the Gradientclass too.
Awesome! Now once again, compile the extension and import it to AI2. You’ll now see a whole bunch of new green blocks.
Our extension is almost complete, but before we move further, let’s test the extension by changing a Horizontal Arrangement’s background color. So, let’s drag-drop a Horizontal Arrangement and a Button component in the designer. Set the height and width of the Horizontal Arrangement to fill parent. Finally, arrange the blocks like below:
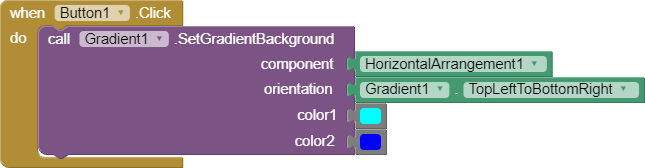
Build the app, or simply live test it with the companion. Open it and as soon as you click the button, the background of the arrangement will turn into a beautiful gradient.
But wait, as I said, the extension is not 100% complete yet, there’s a problem with the extension. You can only use the built-in color blocks to set the colors of the gradient. What if you want to use a HEX color code?
Let’s fix this by adding a new block that can parse the HEX code and convert it into an integer that our SetGradientBackgroundmethod can understand. To do this, we’ll create a purple-colored method block. So, add the below block of code to the Gradient class.
Observations 👀
- You can also create method blocks that return something, like an
intwith the help of@SimpleFunctionannotation. - The method
parseColor()from the classandroid.graphics.Colorparses a HEX color code into an integer.
Nice! Our extension is now complete and ready to be used. But first, I want you to give our extension some finishing touches.
- Add a description to all the blocks using the
descriptionattribute. Also, add a description to the extension by using thedescriptionattribute in the@DesignerComponentannotation. - Add an icon to the extension. To do this, you have two options — 1. you can use an image URL and add it to the
iconNameattribute in the@DesignerComponentannotation or 2. use a local image. - To use a local image as the extension icon, first, create a folder named
aiwebresat the same level/directory as yourGradient.javafile and add your image to it. Now, iniconNameattribute in the@DesignerComponentannotation of yourGradient.javafile type this —"aiwebres/YOUR_IMAGE_NAME.png. ReplaceYOUR_IMAGE_NAMEwith the actual name of your image. - Tip: For best results, use an image having dimensions of 16✕16 pixels.
Excellent! Your extension is now 100% ready and you can use it in your apps! 😋
What next 🔥
There’s still a lot more to learn about extension components. The best way to learn on your own is by checking out App Inventor 2 sources, and understanding how the internal components work.
Our Gradient extension currently only uses two colors to create gradients, so, as a challenge, I want you to modify the extension so that it can accept an indefinite list of colors and use those colors to make a gradient. So, give it try and let me know how it goes. Don’t forget to share your solution with me through Telegram or Twitter. 😃
If you’ve faced any difficulty while following the guide, please let me know in the comments or simply contact me through Telegram or Twitter. 😊